Overview
Some people get confused when dealing specially with footers in TableView. So, I decided to write this post to better explain these elements. (I used iOS 8.1 to make the examples in this post)
In your tableview you have 2 types of footers: one is the section footer and the other is the tableview footer.
As you can figure out by the name, the section footer appears below of each section. On the other side, the tableview footer appears just once at the end of the tableview.
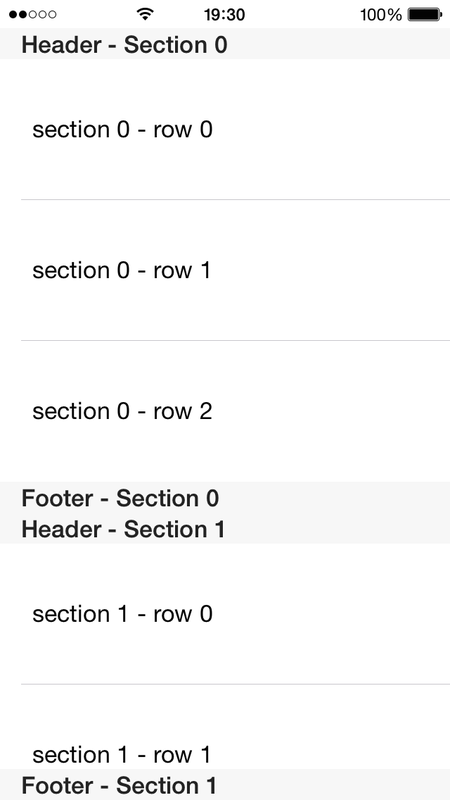
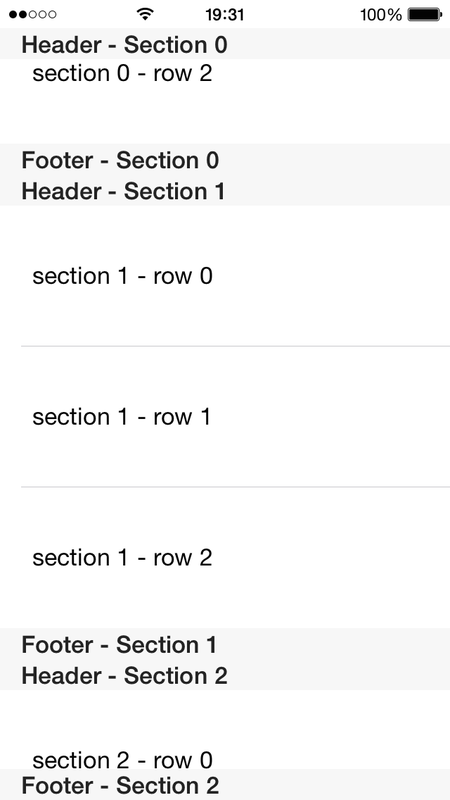
Let's see what is like a tableview with footers (and headers)
That tableview above has in total 4 sections, each one with 3 rows.
The first thing to notice is that the footer of the last visible section always appears on the bottom of the tableview (which here is also the bottom of the screen), even if that section is not fully visible. (In the same way, the header always appears fixed on top of the tableview)
That behavior sometimes is not expected by a developer, which expects the footer to behave as any other cell. So, if you want a footer that is always the last cell of your section and does not show always on the screen, you need to do some workarounds.
One workaround is to simply add 1 extra cell to each section and treat that cell as your footer. Other workaround (I did not personally test it, but heard from others that works) is to use tableview with static cells, which appears to not stick the footer to the tableview. Of course, all these workaround requires some coding to work properly.
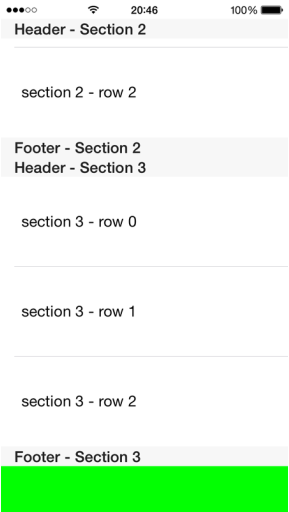
Now, the tableview footer, is the footer that will appear after the last section footer. You can see that in the image below:
As you can see, I am using as the tableview footer a (empty) View with a green background. Now, let's see how I created these headers and footers.
Implementing Headers, Footers in Tableview
The sections headers and section footers are added via the delegate functions while the tableview footer is added by creating a UIView and setting that view to the tableFooterView property of your tablewView.
Let's see some code:
Let's see some code:
//
// ViewController.swift
// tableview example
//
import UIKit
class ViewController: UIViewController, UITableViewDataSource, UITableViewDelegate {
@IBOutlet weak var tableView: UITableView!
var tableDataRows = [
["section 0 - row 0","section 0 - row 1","section 0 - row 2"],
["section 1 - row 0","section 1 - row 1","section 1 - row 2"],
["section 2 - row 0","section 2 - row 1","section 2 - row 2"],
["section 3 - row 0","section 3 - row 1","section 3 - row 2"],
]
var tableDataSectionHeaders = ["Header - Section 0", "Header - Section 1", "Header - Section 2", "Header - Section 3"]
var tableDataSectionFooters = ["Footer - Section 0", "Footer - Section 1", "Footer - Section 2", "Footer - Section 3"]
override func viewDidLoad() {
super.viewDidLoad()
// Do any additional setup after loading the view, typically from a nib.
var tableViewFooter = UIView(frame: CGRect(x: 0, y: 0, width: 600, height: 50))
tableViewFooter.backgroundColor = UIColor.greenColor()
tableView.tableFooterView = tableViewFooter
}
override func didReceiveMemoryWarning() {
super.didReceiveMemoryWarning()
// Dispose of any resources that can be recreated.
}
//TableView delegates
func numberOfSectionsInTableView(tableView: UITableView) -> Int {
return 4
}
func tableView(tableView: UITableView, numberOfRowsInSection section: Int) -> Int {
return 3
}
func tableView(tableView: UITableView, heightForRowAtIndexPath indexPath: NSIndexPath) -> CGFloat {
return 100
}
func tableView(tableView: UITableView, titleForHeaderInSection section: Int) -> String? {
return tableDataSectionHeaders[section]
}
func tableView(tableView: UITableView, titleForFooterInSection section: Int) -> String? {
return tableDataSectionFooters[section]
}
func tableView(tableView: UITableView, cellForRowAtIndexPath indexPath: NSIndexPath) -> UITableViewCell {
var cell = self.tableView.dequeueReusableCellWithIdentifier("tbCell", forIndexPath: indexPath) as tbCell
cell.label.text = tableDataRows[indexPath.section][indexPath.row]
return cell
}
}
So, the tableview footer is the first set of green code above.
The headers and footers and the other set of green code. I just used the delegate functions to add a title to the header and footer.
If you want to customize the section footer/header, you can use the following delegates:
The headers and footers and the other set of green code. I just used the delegate functions to add a title to the header and footer.
If you want to customize the section footer/header, you can use the following delegates:
func tableView(tableView: UITableView, viewForHeaderInSection section: Int) -> UIView? {
// enter your code here
}
func tableView(tableView: UITableView, heightForHeaderInSection section: Int) -> CGFloat {
// enter your code here. Needs to return height of the header
}
func tableView(tableView: UITableView, viewForFooterInSection section: Int) -> UIView? {
// enter your code here
}
func func tableView(tableView: UITableView, heightForFooterInSection section: Int) -> CGFloat {
// enter your code here. Needs to return height of the footer
}
// enter your code here
}
func tableView(tableView: UITableView, heightForHeaderInSection section: Int) -> CGFloat {
// enter your code here. Needs to return height of the header
}
func tableView(tableView: UITableView, viewForFooterInSection section: Int) -> UIView? {
// enter your code here
}
func func tableView(tableView: UITableView, heightForFooterInSection section: Int) -> CGFloat {
// enter your code here. Needs to return height of the footer
}
That is it. I hope this post help you better understand the section header/footer and the tableview footer.
If you are new iOS developer looking on how to create a UITableview, the code above is only part of your need. So, don't freak out if you don't understand. To learn the basics of creating a UITableView, I recommend you take a look for tableview tutorials on Youtube. Here is a simple one.
If you are new iOS developer looking on how to create a UITableview, the code above is only part of your need. So, don't freak out if you don't understand. To learn the basics of creating a UITableView, I recommend you take a look for tableview tutorials on Youtube. Here is a simple one.


