Adventures of an Entrepreneur
  • Creating a Mobile Apps/Games Company

What are Imagesheet and Sprites?

4/24/2014

1 Comment

 
If you are starting in game development, you may find yourself lost in some terms that you never heard before. In this post I will talk about 2 of them: Imagesheet and Sprites.

Imagesheet

Imagesheet is simply an image file that has several independent images inside. Here is an example:
Picture
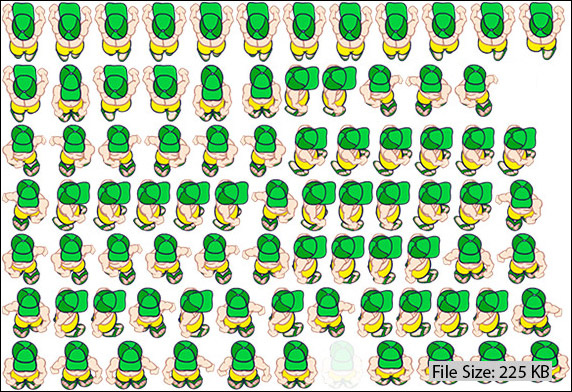
Source: Corona Blog (Dinamically Optimized Sprite Sheets post - 10/09/12) - Link #2
As you can see, inside of 1 image file there are several independent image files. In this case, all independent images are of a boy, but it could be any other image (like bird, lamp, boy, ... everything together in 1 file).

Why would I use an Imagesheet?

There are mainly 3 reasons.

The first reason is performance. Loading an image is an operation that access a file, so it degrades performance. One way of dealing with the performance issue is pre-loading all images when your app/game starts. You could do that by loading each image file, but imagine doing that for 50+ image files? It is much easier if all these images are inside of just 1 image file, so you do only 1 image loading. 

The second reason is optimizing file size. Having several images inside of just 1 image file allows a better use of image compression, resulting in smaller file size.

The third reason is to create animation. If you noticed, the images inside of the imagesheet above are frames of the boy walking. If you go thru these images within a certain speed, you will see the boy waking. That kind of animation using an imagesheet is what we call sprites (we talk about sprites just below).


How do I access an image inside the imagesheet?

That depends on the coding language that you are using. But the main principle is always the same: you pass the imagesheet file and some extra information about the position of the image that you want.

Sprites

As mentioned above, we usually refer to sprites as set of images that together create an animation. Each image that is part of the total animation is called frame and when we pass thru the frames at a certain speed you see an animation.

Below is the animation of the boy walking. It was done using the imagesheet above using the first two images of the 3rd row, at the speed of 2 frames per second. 
Picture

Create Imagesheets/sprites

You can create a imagesheet manually by putting all your images together in the same file, but doing that way is time-consuming and you will not benefit from compression improvements.

So, there are a lot of tools that you can use to create a imagesheet, These tools makes you life easier and you just need to pass the image files and it creates the imagesheet for you. One software that I like and use is the TexturePacker. It is very simple to use and it also allows you to create imagesheets directly from swf files.

Imagesheets/Sprites on Corona SDK

If you are using Corona SDK to create your app/game and want to learn more about the code specifics, just read the links below:

[1] http://coronalabs.com/blog/2013/05/14/sprites-and-image-sheets-for-beginners/
[2] http://coronalabs.com/blog/2012/10/09/dynamically-optimized-sprite-sheets/


That is it for today. 
1 Comment

SSL Certificates + Adding SSL certificate on your Website

4/2/2014

0 Comments

 
Nowadays, the use of SSL on your website or internet communication is a must. So, in this tutorial I will show the common types of SSL and how can you add it to your website.


What is SSL?
SSL means Secure Sockets Layer and it has the objective of protecting (via encryption) your communication over the internet.


If you use internet banking, you should be familiar with seeing a "Lock" icon on your browser, indicating that your communication is secure. This is usually done automatically when you access your bank website using httpS instead of the normal http. This happens because the browser identifies that the server is using a SSL certificate issued by trustful company (called Certification Authority - CA). You can create own your SSL certificate (instead of one issued by a CA) but the browsers would not recognize you as one of their trustful companies, so even thought the communication will be encrypted, the "lock" icon will not appear and probably an alert will be given by the browser to notify the user about that.

So, having a SSL certificate issued by a CA is the best way to show to the users/visitors of your website that their communication is secure and your website belongs to you.


Types of SSL Certificates
To have a SSL certificate issued by a CA, you just need to go to a CA website or one of its representatives (usually the Domain Providers are) and buy one. The CAs sells different types of Certificates, each one with different objectives and types of verification and even warranty.


For our purposes, we will restrict ourselves to Domain Validation purposes, that is when you just want to have your domain using a SSL Certificate issued by CA without further validation (like Organization validation).


A SSL Certificate can be issued to validate 1 domain (like www.redbeachgames.com) or several domains. So, CAs have several packages with different prices. One package that is pretty common is the Wildcard SSL certificate, that is when 1 SSL certificate can be used for validating any subdomain variation, like redbeachgames.com, www.redbeachgames.com, news.redbeachgames.com,.... Usually we indicate wildcard domain using "*" as *.redbeachgames.com.


Prices of a SSL Certificate issued by CA
SSL Certificate price varies a lot among CAs. So, I recommend you to do a extensive search to find the best cost-benefit for you.

The place that I found to have the best price was on Namecheap that is a Domain Provider that sells SSL certificates issued by several CAs like Comodo, Verisign,...  The SSL certificate is totally independent from where is your domain is parked, so you can have a domain from GoDaddy and buy the SSL Certificate from Namecheap, after all, what matter is the CA issuing the SSL Certificate and the provider that is running your webserver/webpage.

Just to give you a range of price, you can buy a single domain validation for ~9/year or a wildcard domain validation for ~$95 / year.

You may think: "So, if I have 10 different subdomains or less, it is better to buy separate certificates instead of 1 wildcard certificate". That might not be true. Some website providers also charge you for using SSL. Example, right now Windows Azure charges $9 per month (prorated hourly) per certification. Besides that, having several certificates just add more work, since you will have to manage them all separately.


How to add a SSL Certificate to my website:

The overall process is:
1) Choose a SSL Certificate package from a CA
2) Create a CSR (Certificate Signing Request) on your local machine
2) Send the CSR to the CA (Certification Authority - the company that will create your SSL certificate)
3) The CA will send you the Certificate. Now, you just need to configure your server to use it.


So, let's go the step by step tutorial:


1) Choose a SSL Certificate package from a CA
Prices varies a lot. I found that if you buy the SSL directly from the CA website you might not get the best price. Usually Domain Providers sells SSL issued by CAs and they have a better price.

As mentioned before, the place that I found to have the best prices was Namecheap. And their customer support is also great. 


2) Create a CSR (Certificate Request) on your local machine
On your MAC (if you use Windows, click here and follow the instructions of "Get a certificate using Certreq.exe"), open your terminal and type: 
openssl req -new -nodes -keyout myserver.key -out server.csr -newkey rsa:2048
After running the command above, you will be asked some information that are straight forward to be filled. The only attention that you need to have is when filling the "Common Name" that should be filled with the website address that you want to use the SSL like "www.redbeachgames.com". If you are using a wildcart SSL, you can fill it with "*" in the subdomain, like "*.redbeachgames.com".
Country Name (2 letter code) [AU]:BR
State or Province Name (full name) [Some-State]:Rio de Janeiro
Locality Name (eg, city) []:Niteroi
Organization Name (eg, company) [Internet Widgits Pty Ltd]:Red Beach Games Ltda
Organizational Unit Name (eg, section) []:
Common Name (e.g. server FQDN or YOUR name) []:*.redbeachgames.com
Email Address []:admin@redbeachgames.com

Please enter the following 'extra' attributes to be sent with your certificate request
A challenge password []:
An optional company name []:


3) Send your CSR to your CA
This is step is usually pretty simple. Usually the company from you bought the SSL certificate (the CA or its representatives like Domain Providers - GoDaddy, Namecheap,...) will ask you to upload or simply paste the CSR content on its page. 

If you used the command above, your CSR will be the file server.csr.


4) Configure your web server to use the SSL Certificate
Each server has its own way of being configured to use the SSL, so I suggest you to look on your server provider for instructions.
If you are using a Windows Azure Website, you can find the instructions here.

That is it. Hope that you find this tutorial useful. If you want to know more about a specific tech/mobile topic, just let me know on the comments.


Another useful links:
SSL on Azure Web sites: http://www.windowsazure.com/en-us/documentation/articles/web-sites-configure-ssl-certificate/

CSR generation on different systems:  
https://support.comodo.com/index.php?_m=knowledgebase&_a=view&parentcategoryid=33

0 Comments

How to unpack / pack an APK file

3/31/2014

17 Comments

 
Did you know that when you download an Android App from Google Play or Amazon Store, you are actually downloading 1 single file?

That file has an APK extension and it is a kind of zip file. In fact, if you rename the extension from APK to ZIP and extract it, you will be able to navigate thru its asset files (images, audio,...). But unzipping the file does not make all its content accessible. E.g, if you try to open the AndroidManifest.xml, you will see that its content is not on plain text. So, if you want to correctly unpack all files from the APK, you can use a tool called apktool.

Here is a step-by-step tutorial to unpack an APK file:

1) Download the apktool file and its system dependency file, both available for free here. (For example, If you are using an MAC, you will have to download: apktool1.5.2.tar.bz2 and apktool-install-macosx-r05-ibot.tar.bz2). 

2) Extract both files to same directory (to make things easier :) )

3) Put the apk file that you want to unpack in that same directory

4) Unpack the apk doing with the following command: "./apktool d [your apk file]" (this is a MAC/linux
command, if you are using Windows, it should probably be "apktool d [your apk file]")

 That is it, the apktool will have created a new directory with the same name of your apk file where you will find the apk content.

If you want to pack that directory back again into an apk (let's say, after you edited something), just use the following command: "./apktool b [apk dir name] [apk file.apk]"


Important note: when you unpack and pack back the apk, it loses its android signature. So, if you want to install that apk on a device, you have to sign it again using the android Debug Key or your own key. You can do that by running the following command: "jarsigner -verbose -keystore [your keystore file] [your apk file.apk] [your keystore alias]"
17 Comments

Setting up AWS SNS to send Push notifications to iOS devices

3/7/2014

32 Comments

 
Hi.

Today I will be showing you how to set up AWS SNS. The Amazon Web Services (AWS) Simple Notification Service (SNS) is a service that allows developers to use the AWS infrastructure to send Push notifications to devices (it can also be used to send SMS or messages to other services like the AWS Queue, but these are not in the scope of this tutorial).

Push notification are those messages that smartphone/tablet users receive that popups in the device screen. They are called as "Push" because it is the server that pushes the message to the device and not the app that requests the message from the server. 

Let's start.

#1) Log into your AWS Management Console and click on "SNS Services" under the "App Services" category.
Picture
#2) In the SNS dashboard, select the Region that you want to use for the SNS Service. Theoretically, you should select a region that is closer to your end users. We will be using N.Virginia for this tutorial.
Picture
#3) Click on "Add a New App"
Picture
#4) Fill the required info.
Application Name:  You can choose any app. I like to set a name that relates to the app that this SNS will provide the messages
Push Platform: You need to choose what platform will this SNS use. If your app is an iOS app, you need to choose the Apple Push Notification Service (APNS). During development, it is recommended to use the Apple Push Notification Service Sandbox (APNS_Sandbox). You also have the option to choose the Google service or Amazon. We will choose here Apple Push Notification Service Sandbox.
Credentials: in this section you will have to enter the credentials of the Push Platform selected above. On the APNS, we need to enter the Certificate and Private Key. We can enter them directly in the box or we can simply select the P12 private key file and the Certificate and Private Key info will be automatically filled. Let's do it by the simple way (choosing the file).
Picture
You probably are asking "Where is that p12 private file??". It is probably nowhere yet. We need to export it from the Keychain Access of your MAC developer machine. Of course, you already need to have it installed in your MAC, if you don't have it, please read my previous post on "Enabling Push Notifications for an iOS app". Let's export that private key then.

#4.1) Access your Keychain Access and select "Login" in the Keychains#4.2) Make a right click on the correct app private key and select Export.
Picture
#4.3) Set a password for the file.
Picture
#4.4) The system will ask for you MAC login password before exporting the file. 
Picture
$4.5) Save the p12 file somewhere. 
Picture
#5) Now, go back to the AWS SNS New App screen and select the private key that you just exported. It is a p12 file.
#6) Enter the password that you set on the item #4.3 and press "Load Credentials from File"
#7) Now, just click on "Add New App"
Picture
That is it. Now you have set the AWS SNS to send Push Notifications. 

You maybe thinking: "Ok, but how do I send a Push message?". Well first you need to register the device that will receive the Push Notification with the SNS service.

In SNS Dashboard of the app that you just configured, you can see the devices that are registered to receive the Push Notification. Since, we just configured the service, we have none. You need to make your app (in this case an iOS app) to register the user iPhone/iPad with the SNS Service. You do that by passing the device push token that Apple will provide to your app. If you already have that token and just want to test the SNS Service, you can add it manually by clicking on "Add Endpoints" (Endpoint in our environment here is a user device). The EndpoinArn info that you also see in the console is like the "AWS SNS token" for that device. After you add a iOS device token, the SNS you create a EndpointArn.

To send a Push notification to that device, just select it and go on "Endpoint Actions -> Publish". Just type the message and click on "Publish Message". If you set everything right, you should receive a Push notification on that device.

Of course, sending Push Messages manually for you game/app is not very fun. So, you need to have a server and configured it to communicate with the AWS SNS and send the messages for you.  AWS has SDKs for several languages (.NET, PHP,...), so you can get the SDK go thru their documentation to configure your server.
Picture
That is it. Hope that this tutorial helps you and if you want to know more about that or other mobile topic, just let me know.
32 Comments

Enabling Push Notifications for an iOS app

12/31/2013

4 Comments

 
Push Notifications are a powerful tool not only for you to communicate with your users but also to let them communicate with each other.

In this tutorial I will show you how to enable an iOS app to receive Push Notifications and in the next tutorial I will show you how to configure the AWS (Amazon Web Services) SNS service to send Push notification to an app.

So, let's start the step-by-step tutorial.

#1) Go to http://developer.apple.com
#2) click on "Member Center"
Picture
#3) Log in using your Developer Account
Picture
#4) Select "Certificates, Identifiers & Profiles"
Picture
#5) Go to "Identifiers"
Picture
#6) Select the app that you want to enable the Push Notification. (If your app doesn't have an app id yet, you need to create one. In that case, click on "+" symbol and create it.)
Picture
#7) Click on "Edit"
Picture
#8) Check the box to enable the Push Notification
Picture
#9) Now you need to create a certificate. You can create a "Development Certificate" that is for you to use while developing your app or create a "Production Certificate" that is when your app is already done and you are going to publish it on the store. Here I will be creating an "Development Certificate".
Picture
#10) The process of creating a certificate begin in your local computer (that needs to be a Mac), by creating a Certificate Request. To create that you just need to follow the steps described on the image.

#11) After creating the Certificate Request, press "Continue".
Picture
#12) Now we need to upload the Certificate Request that was just created.
Picture
#13) Then click on "Generate" to create your Certificate.
Picture
#14) Then just download the Certificate if you want it. You can always download it later on the "Certificates" section of that page.
Picture
After these steps you have enabled your iOS app to receive Push Notification.

But, how do you actually send the notifications to the device? Well, that is subject of the next tutorial where I will show you how to set up the AWS SNS that you can use to send the notifications to the devices.

UPDATE: Click here to go the next tutorial (Setting up AWS SNS to send Push notifications to iOS devices)

Take care and Happy New Year.
4 Comments

Video: The data behind the games

11/5/2013

3 Comments

 
This video shows the basic data that you need to look after you launch your game. It also provides some metrics based in the expertise of the presenter. Great video.
3 Comments

Code: Checking if the iOS is jailbroken

10/31/2013

0 Comments

 
Sometimes is useful to check if your app/game is running in a jailbroken device, specially regarding security issues. Although Apple does not provide you with a function to check if the device is jailbroken or not (and in fact, they shouldn't, after all, if Apple provides that function, it will be one of the first things that the jailbroken script would modify), there is a very easy way to find that out. You can just use the code below.
Objective C code:
FILE *f  = fopen(“/bin/ssh”, “r”);

If f~= NULL then
{
      //jailbroken!!
}

fclose(f)

0 Comments

Code: Calculating MD5 from a file using Corona

9/27/2013

0 Comments

 
MD5 is very useful to verify the consistency of file, specially after a file transfer. Below I show you how can you calculate the MD5 of file using Lua/Corona.
local function calculateMD5 (filename, systemDirectory)
    
    systemDirectory = systemDirectory or system.DocumentsDirectory -- using DocumentsDirectory as default if param not provided
    
    local crypto = require "crypto"

    local rfilePath = system.pathForFile( filename, systemDirectory  ) 
    if rfilePath == nil then  -- this can be nil when using ResourceDirectory. If using DocumentsDirectory or TemporaryDirectory, it will return "not nil" even if the file does not exist
        print("Error: file does not exist")   -- error
        return false
    end
        
    local rfh = io.open( rfilePath, "rb" )              
    if rfh == nil then
        print("Error: file does not exist")   -- error
        return false
    end
    
    local data = rfh:read( "*a" )
    if not data then
        print( "Error: read error!" )        
        return false
    end
    io.close( rfh )
    
    local hash = crypto.digest( crypto.md5, data )                
    
    return ( hash )   
        
end
0 Comments

Creating a VB.net "WebService" for your Corona app/game

5/25/2013

1 Comment

 
Hi there.

When you want to create multiplayer games or communicate data between your app in different devices you need a server to be the "middleman". Today you can find some companies offering that kind of service for you (Corona has the Corona Cloud, Google now have the Google Play Game Services, ...) but sometimes these services are not sufficient for you (because the free tier price is not enough, or you need more flexibility of types of data that you store,...). So sometimes you need to have your own server.

These type of server that has the mission of providing data for application is called WebService, WebAPI or REST API and in this post I will show you how you can create your own "WebService" for you Corona app. 

You can use any type of language to create the server (PHP, ASP,....). In this case I will be creating a VB.NET server.

I use the quotes in WebService because we are not actually creating a WebService, but a simple WebPage that will receive your app request, process it and give a response. It will work as the same as a WebService and until not I did not find any big difference between the two, even in terms of performance. So, Let's go.

This example will be a game requesting the server all multiplayer games of that user and a specific opponent. So, the app will make a request for the server passing the params via GET and receive the response in JSON format.

Code in the app

-- Function that makes a http request to a server and returns false if not succeed, or returns true and the response if  operation was done with success

function getJSONFromServer(serverURL, paramsToBePassed)

    local json = require "json"
    local jsonData = {}
    local linkComplete

    local paramToString = function(paramsTable)
        
        local str = ""
        local i = 1
        
        for paramName,paramValue in pairs(paramsTable) do 
            if i == 1 then
                str = paramName .. "=" .. paramValue
            else
                str = str .. "&" .. paramName .. "=" .. paramValue
            end
            i=i+1
            
        end
        
        return str
        
    end

    local linkComplete = serverURL .. "?" .. paramToString(paramsToBePassed)
        
    -- Makes the request to the server
    local requestResult, requestResultCode = http.request{url = linkComplete, sink = ltn12.sink.table(jsonData), headers = {accept = "application/json"} }
    
    if (requestResult == nil or requestResultCode ~= 200) then  -- Something wrong occurred in trying to download that page, return false
            return false
    else -- download from internet was done with success
        local jsonFree = json.decode(table.concat(jsonData))  -- decodes the JSON data to a table        
            return true, jsonFree
    end
    
end

Code in the server (VB.NET) - filename: getgames.aspx

Partial Class getGames

    Inherits System.Web.UI.Page

   Public Class gameInfoClass
        Public localPlayerID As Integer
        Public opponentPlayerID As Integer
        Public opponentName As String
        Public gameScore As Integer
    End Class

    Public Class OutputClass
        Public status As Boolean
        Public errorMessage As String         
        Public gamesList As New List(Of gameInfoClass)
    End Class


    Protected Sub Page_Load(sender As Object, e As System.EventArgs) Handles Me.Load

        Dim output As New OutputClass

        Dim OKToProceed As Boolean = True

        'Retrieving the GET params
        Dim localPlayerID As String = Page.Request.QueryString("playerID")     
        Dim opponentPlayerID As String = Page.Request.QueryString("opponentID")
      
        'Verifying if required params were entered

        Dim allParamsEntered As Boolean = True

        If localPlayerID = "" Or opponentPlayerID = "" Then

            allParamsEntered = False        

        End If

        If allParamsEntered = False Then
            output.errorMessage = "Required parameters missing"
            OKToProceed = False
        End If

        output.status = OKToProceed

        If OKToProceed = True Then

            ''Opening Connection
            Dim BDConnection = ConfigurationManager.ConnectionStrings("myConnectionString").ConnectionString

            Dim sqlConnection1 As New System.Data.SqlClient.SqlConnection(BDConnection)

            Dim cmd As New System.Data.SqlClient.SqlCommand

            cmd.CommandType = System.Data.CommandType.Text

            cmd.Connection = sqlConnection1

            cmd.CommandText = "SELECT * FROM vw_games WHERE (local_player_id = @localPlayerID and opponet_player_id = @opponentPlayerID)"
            cmd.Parameters.Add(New System.Data.SqlClient.SqlParameter("@localPlayerID", localPlayerID))
            cmd.Parameters.Add(New System.Data.SqlClient.SqlParameter("@opponentPlayerID", opponentPlayerID))

            Try

                sqlConnection1.Open()
                Dim reader As System.Data.SqlClient.SqlDataReader
                reader = cmd.ExecuteReader()
                Do While reader.Read()                    Dim gameInfo As New gameInfoClass
                    
                    gameInfo.localPlayerID = reader("localplayer_id")
                    gameInfo.opponentPlayerID = reader("opponent_id")
                    gameInfo.opponentName = reader("opponent_name")
                    gameInfo.gameScore = reader("game_score")

                    output.gamesList.Add(gameInfo)                     

                Loop

                sqlConnection1.Close()

            Catch ex As Exception

                output.status = False

                output.errorMessage = "Database Error"

            End Try

        End If


        'Writing the output to JSON format
        Dim outputJSON As String
        outputJSON = Newtonsoft.Json.JsonConvert.SerializeObject(output)

        'Printing the JSON in the screen
        Response.Clear()
        Response.Write(outputJSON)
        Response.ContentType = "application/json"
        Response.End()

    End Sub


End Class

So, an example of the usage of the code above in your app would be:
local params = {}
params.playerID = "3435434"
params.opponentID = "122343"

local gamesList = getJSONFromServer("http://www.mywebsite.com/getgames.aspx", params)

Some Important Information:
  • You need to add the Newtonsoft.JSon reference to your VB.net site. You can do that by going in Tools->"Add Library Package Reference" and installing the "Newtonsoft.JSON" in your Visual Studio / Visual Web developer IDE.
  • The code above is a mix of some codes that we use in our games and I did not test. If you find any difficult in running, please let me know and I can help you. Maybe I made a mistake when putting together the code
  • I highly recommend you to use a https server so you data in encrypted during communication between your device and your server

The code above use GET params and sometimes GET is not the best method to pass the params (Ex: Specially if you have a large amount of data to pass). In that case, you would want to pass the params via POST. The code with POST params will be almost the same but you would have to make the following modifications:


1) Delete these lines in the app code:
local linkComplete = serverURL .. "?" .. paramToString(paramsToBePassed)
        
    -- Makes the request to the server
    local requestResult, requestResultCode = http.request{url = linkComplete, sink = ltn12.sink.table(jsonData), headers = {accept = "application/json"} }
2) Add these lines in the app code in the same place of the lines above:
local body = paramToString(paramsToBePassed)
    
    local headers = {
        accept = "application/json", 
        ["Content-Type"] = "application/x-www-form-urlencoded",
        ["Content-Length"] = string.len(body),
        ["Accept-Language"] = "en-US"        
        }

    -- Downloading a specific page of popular actors
    local requestResult, requestResultCode = http.request{url = serverURL  sink = ltn12.sink.table(jsonData), method = "POST", headers = headers, source = ltn12.source.string(body) }
3) Delete these lines in the Server Code
      'Retrieving the GET params
        Dim localPlayerID As String = Page.Request.QueryString("playerID")     
        Dim opponentPlayerID As String = Page.Request.QueryString("opponentID")
4) Add these lines in the Server Code in the same place of the lines above
      'Retrieving the POST params
        Dim localPlayerID As String = Page.Request.Form("playerID")
        Dim opponentPlayerID As String = Page.Request.Form("opponentID")

Hope that this example helps you in developing your server.

See you.
1 Comment

Great (free) maganize about Casual Games industry

4/22/2013

21 Comments

 
If you are a developer or just curious about the Casual Games industry, I highly recommend you to read the Casual Connect magazine. 

It has very good articles about marketing, user acquisition and other topics related to the industry. And it is free :).

Casual Connect Maganize:  http://casualconnect.org/magazine-archive/
21 Comments
<<Previous

    Author

    This blog it not updated anymore.  

    Archives

    February 2015
    June 2014
    May 2014
    April 2014
    March 2014
    January 2014
    December 2013
    November 2013
    October 2013
    September 2013
    August 2013
    July 2013
    May 2013
    April 2013
    March 2013
    February 2013
    January 2013
    December 2012
    November 2012
    October 2012
    September 2012
    August 2012
    July 2012

    Categories

    All
    Data
    Event
    Fun
    Games
    Key Success Factors
    Management
    Marketing
    Mobile
    Monetization
    Movies
    Startup
    Statistics
    Technical
    Tutorial
    Videos

Powered by Create your own unique website with customizable templates.